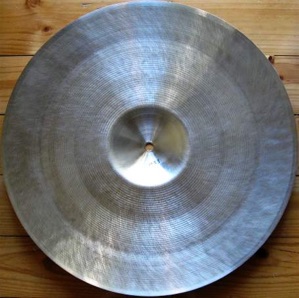
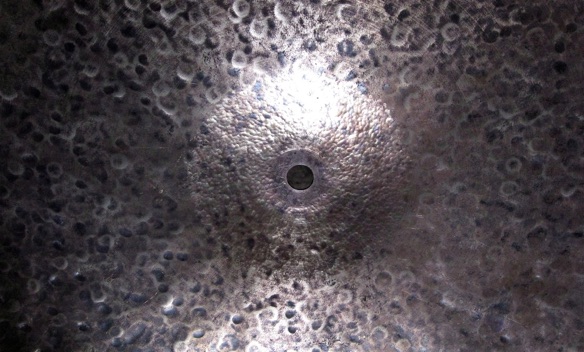
Hammering 101

Disclaimer: ANYONE CHOOSING TO ENGAGE IN ANY CYMBALMAKING ACTIVITY DOES SO AT HIS/HER OWN RISK. CRAIG LAURITSEN AND/OR CYMBALUTOPIA ASSUMES NO LIABILITY FOR ANY PERSONAL AND/OR PROPERTY DAMAGE OR LOSS INCURRED BY ANYONE ATTEMPTING TO USE THIS INFORMATION.
The Basics -
All of the heat work for B20 has been done at the foundry.
A B20 blanks final heat treating process is annealing, which is locking the alloy in it’s softer phase so that it can be worked.
Applying heat (over about 200°C) to a B20 blank will affect the temper and make it brittle and prone to cracking.
Hammering is basically cold impact hardening of the bronze.
Good cymbal-smiths can change the shape and the amount and distribution of tension throughout the cymbal, in order to achieve specific sound characteristic (SC) goals.
Most cymbals have little or no ‘fine tuning’.
A master-smith or independent cymbal-smith can, through carefully planned hammering and lathing strategies, alter the sonic characteristics and create a more musical instrument.
My strategy is to work with the existing SC’s (sonic characteristics) of a cymbal and fine tune
what’s ‘already there’.
Things such as where on the cymbal you hammer, the density and force of hammering, the tools used and whether you hammer from the top or the underneath of the cymbal, all impact on the final result in different ways.
Understanding the possible outcomes of different hammering strategies is complicated and can only be mastered through experience.
Some cause and effect simplifications -
- Top Hammering increases tension.
- Bottom Hammering loosens tension.
Basic Technique -
- Make sure that there is good contact between the cymbal and the anvil.
- Don’t hammer too much in one area or the bronze will be ‘thinned out’ or overly deformed or work hardened at that point.
- Let the cymbal rest for at least a few days after each hammering session. It’s much better to do too little in each session than to risk cracking or thinning of the bronze.
- Never apply heat to a B20 or B20+ cymbal, as it can alter the temper and adversely affect the sound, or even worse, lead to cracking.
- Regularly re-face your hammers and anvils.
Tools -
Unfortunately, you can’t just go down to the local hardware store to source tools specifically designed for modifying cymbals. But you can find and modify readily available products to perform the job.
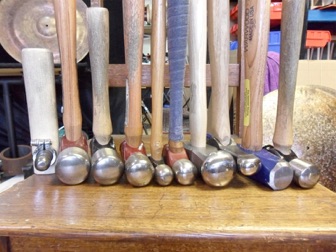
Hammers -
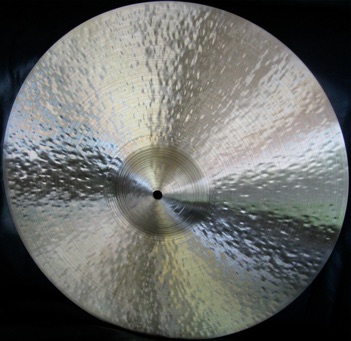
Most of my hammers are ball pein hammers that have had the faces rounded and shaped by a belt sander. Progressively finer grades of sandpaper are used until finally, I polish the faces to a smooth finish by hand, with wet and dry sandpaper.
At least 3 hammers of different weight and degree of rounded face are used in most of my modifications and custom cymbals from a blank. The weights are 12 oz, 16 oz, 24 oz, 32 oz and 40 oz. The faces have differing degrees of curvature which plays an important role in the ‘drawing up’ of the bronze and the subsequent effect on sound.
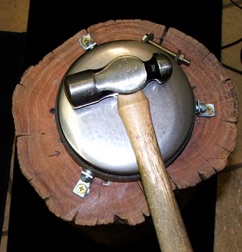
Anvils -
High carbon steaks from a steel round are used to make my anvils.
Only steel which has the necessary levels of carbon can be hardened and tempered.
D2 tool steel can be shaped and then hardened (professionally by a machine tool shop) or you can use EN26 which is already hardened to a reasonable degree.
Diameters and depths between 3 and 6 inches are most functional.
Anvil depth is also important as it stops the anvil ‘bouncing’.
The face of the anvil is ground to a usable shape by a belt sander and then finished by hand with wet and dry sandpaper.
Any rough spots in the anvil surface will leave undesirable imprints in the hammered cymbal.
One of my favourite anvils was a 120mm diameter steak of D2 (around 2% carbon) steel which I spent around 8 hrs shaping with a belt sander and then sanding block, using progressively finer sandpaper grits. It was then vacuum hardened by a professional tool shop to a hardness of around 62 Rockwell C.
The anvil is then mounted atop any appropriately sized piece of lumber.
You can hacksaw a few small slots in the base of the anvil and place screws through the slots and into the mounting timber. Alternatively, a central spike can fix the anvil to the timber base or, as is the case with one of my anvils, a brace can be made.
I’ve spent some time sourcing logs for my anvil bases, but another alternative is screwing and glueing 4 posts together.
I’ve also seen smiths use a vice system to mount the anvil, which seems to work best for square shaped anvils.
My preference is wood for the ease of workability and the shock absorbing characteristics.
LESSON 2 -
So, You wanna fix a barking seal (hollow spot) ...........
I've managed to improve or completely fix the 'barking seal' gremlin in a number of my turkish cymbals without resorting to a complete re-hammer and without changing the appearance much at all. Of course sometimes a complete overhaul is necessary, but maybe this is worth a try?
Step 1) Locate the problem area - it’ll sound like hitting a piece of pvc pipe .. this is the easy part. Mark the area with chalk or a sharpie on the top and bottom of the cymbal.
Step 2) Tools - Mike Skiba's (an amazing independant cymbalsmith from the US) article (this can be found on a fantastic website forum called cymbalholics at: http://www.cymbalholic.com/articles/ ) re this is worth reading (again and again !). I can't stress enough how important good shape and a shiny finish on hammer and anvil are.
For this exercise you want a hammer with a larger face. My favourites weigh 16oz and 24oz.
Step 3) The barking seal is caused by one or more of three things:
a) Poor shape
b) Uneven thickness of the bronze
c) Poor tension.
Method - place the cymbal on a stand and check the shape 360 degrees around the cymbal at the same radius where the bark is (thanks Matt Nolan). Sometimes the 'barking' area is affected by the shape in another section of the cymbal. If you think of the cymbal as an umbrella, when you push in one area the tension is changed in other areas, particularly directly opposite.
Taking the plunge - so now for the hard part ... whacking your beautiful cymbal with a hammer.
Rule 1 - take it easy. It's better to do too little than too much.
Rule 2 - Don't hammer too much in one area; or you'll stretch the bronze too much or even crack it.
Rule 3 - Do a little bit of hammering and then let the cymbal rest for a few days and take note of the sonic changes.
If your marked area is a depression (looking from the top of the cymbal) you need to hammer from the bottom initially to stretch the bronze.
Half a dozen hammer blows to begin with. Now, keeping the shape in mind, flip the cymbal and give it a few blows to the top to help re-tension the area. Again check the shape 360 degrees around the cymbal at the same radius as the marked area and also from the marked area to the edge of the cymbal. Make any adjustments, remembering to re-tension from the top if hammering from the bottom. If the shape is looking better, stop and let the cymbal rest.
Two reasons for this - the sound will change over a few days and also it helps teach us patience (vital for any cymbal modifier!) and stops us over hammering an area and creating negative consequences.
Two days later - how is the shape? how is the bark ?
If the shape is pretty good but the bark is still too much for your liking then it's a matter of adjusting the tension.
Again always check the whole radial area of the cymbal and particularly the sections right next to your chalk mark and directly opposite.
As a general rule, top hammering = more tension, bottom hammering = less tension. Of course the shape plays a role here but that's another story.
The ‘fine tuning’ procedure outlined in lesson 1 can also be applied to the hollow section area.
Take it slowly, let the cymbal rest after a little bit of hammering. If the seal isn't quietened after a few sessions, you'll have to more extensively re-hammer the entire cymbal which is a different process.
Of course what I've described here is a process of minimal simplified hammering and the shape and tension across the whole cymbal affects the sound. But sometimes this is enough to fix hollow spots.
One of the important things to remember is to hammer as uniformly (impact pressure wise) as you can and make sure the profile change is uniform around the whole circumference. If part of the cymbal hasn't curved as much at one point, carefully apply more bottom hammering to that point.
You may need to, as Matt N suggested, add some tension to the top if there's too much edge wobble ... only you can decide how tight or loose you want the cymbal to be. Some top hammering may also be needed for the shape.
But I'd suggest that you try hammering one band from the bottom to raise the profile at that point .... get the amount of curvature consistent around the whole circumference and then let the cymbal rest a few days before you hammer another band or whatever. Often after a rest, you may decide that you don't need to add tension with top hammering.
This is one way to increase profile and I think it's a good place to start. I use a few other methods as well. I might try and explain them a little later on.
LESSON 3 -
Raising the profile ........
This is in response to a question I was asked ......
Hi ........,
It's ok if your cymbal looks like a tortilla .... you can still get it back, it's just a bit trickier and you definitely won't get it back in one hammering session. When I've got a tortilla, I'll add a little shape and tension ... let it rest a few days ... more shape and tension ... let it rest a few days.
Basically, after a certain amount of hammering the cymbal won't hold tension anymore .... that is until it's had at least a few days rest from being worked.
Patience grasshopper!! .... That's what I tell myself EVERYTIME I re-hammer a cymbal because (if you're anything like me, you try to do too much in one sitting!). Chinese alloy (and some older Italian alloys) are the most fragile and may need even more rest and reduced hammering time in any one session.
Raising the profile ... Firstly it depends on whether you're after a smooth shape, downwards taper near the edge or whatever.
If you're going for a downward taper at the edge, get your draftsman's compass out and draw a circle with a sharpie on the underneath of the cymbal at the radius where you want the taper to start. If i want a nice smooth taper. I'll draw up to 3 circles 1/2 an inch or so apart.
If you hammer exactly on the sharpie line, fairly densely you'll get this kind of thing happening .....
You can see the line of fairly dense hammering (about 2 inches in from the edge) and how it's affected the shape.
If I wanted a smoother curve, I would have hammered less densely in a wider band from the sharpie-line.
I could then draw another line at a radius closer to the edge and again hammer less densely and in a wider band from the sharpie line. This would increase the profile even more and give a fairly smooth curve that I could adjust further until I was happy.
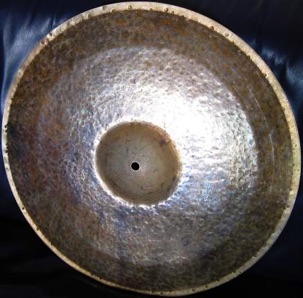
Here's an example of Johan's (another fantastic independent cymbalsmith from Belgium) work doing exactly what I just described ...
This cymbal was originally a flat ride and suffered from a large hollow section spanning from the mounting hole to around three inches into the bow.
My first attempt to fix the problem did not yield the results I was after, so I decided to add a small bell to the cymbal. This would increase the tension in the main hollow area and also add some more complexity, volume and higher frequency response to the sound of the cymbal.
Method -
Adding a bell is a similar process to increasing the profile.
Firstly I mark a circle with a sharpie and a draftsman’s compass, at the circumference of the desired bell size.
Then I draw a series of circles an 1/8th to a 1/4 inch apart, until I reach the mounting hole.
Hammering from the bottom of the cymbal, I hammer in a dense pattern on the sharpie lines, working my way from the mounting hole to the desired diameter of the bell/cup size.
Again, hammer-strokes of as even a pressure as possible and of similar density are desired.
After hammering each sharpie marked circumference, I check for an even shape and fix any inconsistencies with more bottom hammering at the points that need a greater curvature.
After I’d hammered along all the sharpie lines in as consistent a manner as possible, I filled in the gaps between the marked lines and adjusted the shape until I was satisfied.
I let the cymbal rest for 3 days before additional hammering.
If you grab a stick and tap the hammered area of the cymbal each day after hammering, hammering can recommence after two days of no audible sonic change to the hammered area.
The next hammering session finalises the shape of the bell. Another rest follows.
The final hammering session balances the tension of the bell and bridge area and generally requires top and bottom hammering.

LESSON 4 -
Hammering a bell into a flat ride .....
Before and after soundfile of this modification
Shape and tension -
It’s possible to have a cymbal with good shape and poorly distributed tension and also a poor shape with well distributed tension. Ideally both shape and tension are acting in a way which produces the best sonic characteristics for any given cymbal.
Hand Hammering Distinctions -
‘Hand Hammering’ is sometimes used to describe hand programmed randomized machine hammering patterns. Hardly what I’d consider to be hand hammered.
There should be a distinction between cymbals being entirely shaped by individual hammer strokes and ones that are shaped by a press or spin-forming and then receiving token hand hammering after that.
Ideally, hand hammering is the process of a very systematic approach to using tension and form to create a desired outcome, with the use of one hammer hit at a time.
LESSON 1 -
Basic Re-hammer, Resting the Cymbal, Fine Tuning.
Basic Re-hammering Technique -
Recently, a Ufip Tiger series ride was given to me with the owner’s instruction to ‘just make it a bit more complex and maybe a touch dryer.’
The basic shape and weight didn’t need altering so I decided to give it a non-specific re-hammer. In other words, there was no corrective hammering needed so an overall re-hammer would give the cymbal the added complexity and slightly dryer wash response requested by the owner.
Hammering Method -
My hammer of choice for this modification is a larger faced 24 oz hammer.
Starting on top of the cymbal at a point just in front of the bridge, I hammer toward the edge, finishing at the edge with a triangular shape (pointed end at the bridge, base of the triangle at the edge). The base of the triangle would typically be 1-2 inches long.
I normally have 12-30 hammer marks (depending on the desired hammering density) contained within each triangular ‘spoke’.
I repeat this process, hammering the same area, but this time from the bottom of the cymbal.
The next area of the cymbal to be hammered in exactly the same way, will be at 180 degrees to the first ‘spoke’ of hammering. The pattern is similar to tuning a drum in the sense that you are always working opposite ends of the circumference before moving to a new point on the circumference.
If we think of the hammered spokes as being numbers on a clock face, this would be the order of hammering:
-1st spoke of top hammering at 12 o’clock
-hammer the same area from the bottom of the cymbal
-2nd spoke of top hammering at 6 o’clock
-hammer the same area from the bottom of the cymbal
-3rd spoke of top hammering at 9 o’clock
-hammer the same area from the bottom of the cymbal
-4th spoke of top hammering at 3 o’clock etc....
This strategy is repeated until the entire area of the cymbal is hammered on both the top and bottom.
A rest of between 3 and 10 days is needed before further hammering.
Resting Method -
Every day at roughly the same time, I tap on each ‘resting’ cymbal (tapping around the cup, bridge, main playing area and edge) to check the sonic changes. Sometimes I record the cymbal each time as a reference, but over time, I’ve learnt to trust my ears.
After two days in a row of identical sonic response, the cymbal is ready for more hammering or lathing.
After a rest, the cymbal had gained complexity and was a little dryer. No shape fine tuning was needed. I did mark a few areas for fine tuning.
Method 1 for Fine Tuning -
The fine tuning method is similar to the process of finding the right spot to apply tape to a cymbal.
I play the cymbal whilst applying light pressure (with the pointer finger of my other hand) to different areas of the cymbal. When I like the small tonal change created by my finger pressure, I place a piece of promark drum gum at that location. I can then continue the procedure until I’m happy with the overall character of the wash.
Then I hammer those marked areas to the desired degree.
After the fine tuning, I made a sound-file for the client, who decided he wanted a little more complexity. So, I repeated the entire re-hammering process using a smaller faced hammer and after 5 days of rest, the client was happy and my job was done.
Some of my favorite hammers have come from the Hammer Source. They have an excellent selection and great service - www.hammersource.com
DIFFERENT HAMMERING TECHNIQUE DESCRIPTORS -
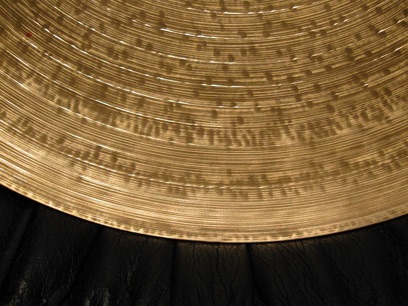
CIRCLE/CIRCULAR HAMMERING - The basic method entails hammering in a circular pattern, with ever increasing (or decreasing) diameters, usually working from the bridge to the edge.
SPOKES METHOD - Hammering in a triangular ray which starts at the apex at the bridge and ends with the widest point at the edge.
If we think of the hammered spokes as being numbers on a clock face, this would be the order of hammering:
-1st spoke of top hammering at 12 o’clock
-2nd spoke of top hammering at 6 o’clock
-3rd spoke of top hammering at 9 o’clock
-4th spoke of top hammering at 3 o’clock etc....
BAND HAMMERING - This method involves shaping the cymbal by dense hammering in small circular bands. Each band is hammered into a uniform shape, each band ‘connecting’ to the previously shaped area.
I usually shape in bands that are 1 to 2 inches thick.
LINE HAMMERING - As the name suggests, hammering in a line (usually a straight line, but various curved forms can also be used), one hammer-stroke thick. I’ll hammer with different densities (depending on the desired outcome) with a ‘line’ of 2cm to 4cm in length.
POCKET/CLUSTER HAMMERING - Hammering in small pockets (3 to 10 hammer-strokes over a 10, 20 or 50 cent diameter) over a large area of the cymbal.
Sometimes I’ll pocket hammer the entire cymbal from the top and bottom, sometimes a 2cm - 5cm band on the edge only.
Basic Soundwave Theories Applicable to Cymbalsmithing -
As previously mentioned, hammering is systematic work hardening of the bronze guided by a final design outcome.
Sound waves travel faster through denser areas of the same material and slower through less dense areas.
A hammer hit compresses the bronze making it denser.
If the hammer-mark causes greater deformation of the bronze, the sound waves will be disrupted to a greater degree.
As the energy from a cymbal strike travels through the bronze the degree and nature of speeding up, slowing down and general disruption of that energy, will affect the frequencies and subsequent overtones, partials etc. generated within the cymbal.
The high frequencies emanate predominantly from the bell, the mids from the bow and the lows from the edge of a cymbal.
Complexity within a frequency band is created by having a large number of variable densities at the same radial location on the cymbal.
Bronze deformation can reduce the fundamental frequency emanating from of an area or areas within the cymbal. It also plays a role in complexity, often leading to ‘trash’ (white noise created by extreme complexity).
If the cymbal has a very uniform topography and density (to hold shape there must be enough density within the structure to do so) it will have greater potential for volume and sustain and will have a simple tonality.
Greater overall density means a higher pitch.
Cymbals that are pressed into shape have a uniform density and hence simple tonality, which is why further hammering is need to increase complexity and musicality.
